Pages

Welcome to Paul's Kitchen! Many people have been following my food postings on Facebook, and asking for recipes, so I am finally opening a forum to accommodate the many requests.

My feeling about food is that it is an indicator of how well we live. It is my belief that one does not have to be a "gourmet" to eat well, nor does good quality food have to be expensive.

This blog is about cooking, food, dining, dining out, beverages, and sometimes a little humor.

Enjoy, and thank you for visiting!!
Showing posts with label spices. Show all posts

Wednesday, May 22, 2013

Herbed, Spiced & Candied Nuts


Mixed nuts seem to have greatly increased in price over the last couple of years.  The brand name nuts cost a premium, and lower cost nuts seem bland.  In general, within the entire price range of cocktail nuts, they are too stale, soft, salty, flat, flavorless, oily, or just have far too many peanuts in the mix.

I looked up several recipes online for making home roasted nuts, and many were tasty, but not quite what I was looking for.  Often, the recipes were a bit too spiced, overpowering the taste of the nut mixture.  After a bit of playing with recipes, I came up with this mixture which is subtly herbed, spiced, and lightly candied.

Making your own toasted nuts, with raw ingredients, is not as expensive as buying premium brand prepared nuts, but is a bit more costly than buying the generic brands.  Raw nuts are available in bulk at most premium and specialty grocers, and the quality, crispness, and flavor of homemade roasted nuts are superior than any of the store bought brands.  These are fantastic with a glass of wine, and are a pleasant treat for entertaining.

Cooking tip: If you do not like peanuts, substitute raw pumpkin seeds.


Herbed, Spiced & Candied Nuts


Skill level:


Prep Time: 10 minutes
Cook Time: 15-20 minutes
Makes: 3 cups

Ingredients


2 tablespoons light corn syrup
1/2 teaspoon finely chopped rosemary
1/2 teaspoon finely chopped thyme
1/2 teaspoon cayenne
1 teaspoon water
1 teaspoon salt
1 teaspoon black pepper
1 cup of raw almonds
1 cup of raw cashews
1/2 cup of raw peanuts
1/2 cup of raw hazelnuts

Preparation

  1. Preheat oven to 350 degrees F.
  2. In a bowl, combine the corn syrup, rosemary, thyme, cayenne, water, salt, and pepper.

  3. Add the nuts to the candy spice mixture. Stir gently with a rubber scraper to coat all of the nuts.


  4. Line a baking sheet with baking parchment.
  5. Spread the coated nuts in roughly a single layer on the prepared baking sheet.

  6. Place nuts into the preheated oven, and cook for 7 minutes.
  7. Remove nuts from the oven.
  8. Using a spatula, stir the nuts, as the nuts on the outside edges of the baking sheet tend to brown quickly.

  9. Place the nuts back into the oven for another 8 to 13 minutes, until cashews have reached a deep golden brown color.

  10. Remove nuts from the oven, and allow to cool completely.
  11. When nuts are completely cooled, break nuts apart with your hands, and place in an air tight container.


Wednesday, December 26, 2012

Cinnamon Palmiers

Skill level: 
These are not difficult to make, the repeated refrigeration cycles create a long prep time.

Ingredients


1 1/4 cups all-purpose flour
1 teaspoon salt
1 1/2 sticks unsalted butter, frozen
5 to 6 tablespoons ice water
1 cup sugar
2 teaspoons cinnamon

Preparation


  1. Stir together flour and salt in a chilled large metal bowl. Slice frozen butter into flour, gently tossing to coat butter.
  2. Place butter and flour mixture in the refrigerator for 10 minutes.
  3. Remove flour and butter mixture from the refrigerator, and using a pastry blender, break the butter into large chunks.
  4. Drizzle 5 tablespoons ice water evenly over flour mixture and gently stir with a fork until incorporated. Test mixture by gently squeezing a small handful: When dough has the proper texture, it will hold together without crumbling apart. If necessary, add another tablespoon water, stirring until just incorporated, and test again. (Do not overwork dough or add too much water, or pastry will be tough; dough will be lumpy and streaky.)  Note: I usually just work the bough with my hands, it is easier.
  5. Form dough into a 5-inch square, then chill, wrapped in plastic wrap, until firm, at least 30 minutes.
  6. Roll out dough on a floured surface with a floured rolling pin into a 15 by 8  inch rectangle (with a short side nearest you). Brush off excess flour and fold dough into thirds like a letter. Rewrap dough and chill until firm, at least 30 minutes.
  7. Arrange dough with a short side nearest you on a floured surface and repeat rolling out, folding, and chilling 2 more times. Brush off any excess flour, then halve dough crosswise with a sharp knife and chill, wrapped separately in plastic wrap, at least 1 hour.
  8. Stir together sugar and cinnamon, then generously sprinkle a clean work surface with some of cinnamon sugar and place 1 piece of chilled dough on top.
  9. Quickly roll out into a 16 by 12-inch rectangle (1/8 to 1/16 inch thick; if dough becomes too soft, chill on a baking sheet until firm). Trim edges with a sharp knife. Sprinkle top of dough evenly with some cinnamon sugar to cover completely, brushing off any excess. 
  10. Fold 2 opposite long sides of pastry so they meet in center. Fold in same sides of pastry in same manner, then fold one half over the other (like a book) and press gently with a rolling pin to flatten slightly, forming a long rectangular log. Sprinkle with additional cinnamon sugar if dough is sticky.
  11. Chill on a baking sheet, uncovered, until firm, at least 30 minutes and up to 2 hours. Meanwhile, repeat with remaining piece of dough and cinnamon sugar.
  12. Preheat oven to 425°F with rack in middle. Line a large baking sheet with parchment paper.
  13. Cut 1 log of dough crosswise into 1/4-inch-thick slices with a sharp knife and arrange slices, cut sides down, 1 1/2 inches apart on baking sheet. 
  14. Bake until puffed and golden around edges, 7 to 9 minutes. Remove from oven and turn palmiers over with a spatula. (If palmiers begin to unroll, gently press to reshape when cooled slightly.) Continue baking until golden all over and sugar is caramelized, 3 to 5 minutes more. 
  15. Transfer as done (palmiers may not bake evenly) to a rack and cool. Make more cookies on cooled baking sheet lined with fresh parchment.


Tuesday, November 13, 2012

Tabbouleh!

After some really heavy meals last week, I want to come into the holiday season eating healthy, and I will try to eat mainly vegan or vegetarian until Thanksgiving. While this may sound like a challenge, Mediterranean, Middle Eastern, and Indian cuisines offer many flavorful vegetable dishes.  

I chop my parsley in a food processor. 
It only requires a few pulses to have
roughly chopped herbs.
Tonight I am serving Tabbouleh (Arabic: تبولة‎ tabūlah), which is a seasoned salad originating from the mountain regions of Syria, and Lebanon. It is popular throughout the Middle East, with countless regional variations. Traditionally, tabbouleh is made of herbs (usually parsley) and bulgar.  This variation uses barley.

Tabbouleh

Skill level: 


Ingredients


1/4 cup barley
1/2 cup finely chopped yellow onion
2 Roma tomatoes
1 cup finely chopped cucumber
1 cup roughly chopped flat leaf parsley
fresh ground pepper (10 turns, or to taste)
1/2 teaspoon salt
2 tablespoons olive oil
1/3 cup finely chopped mint
juice from 1/2 lemon

Preparation


  1. Boil water, and add barley.  Boil for 20 to 25 minutes, until tender.
  2. Drain barley, and rinse thoroughly with cold water.
  3. combine all ingredients in a bowl, and stir to combine.
  4. Chill for at least one hour to allow flavors to combine.
Tabbouleh, served with hummus garnished with olive oil and paprika, sliced and toasted pita bread, and olive orzo salad.


Saturday, October 20, 2012

Preserved Lemons

I saw this on http://www.saveur.com, and thought that this is something I would like to do someday.

Preserved Lemons


As lemons cure in a salty, spicy brine, their flesh softens and sweetens; after a month, they're ready to be finely chopped and added to everything from Moroccan tagines to vinaigrettes.


ENLARGE IMAGE: Credit: Todd Coleman
MAKES ABOUT 1 QUART

Ingredients


6 medium lemons
¼ cup kosher salt
2 cups fresh lemon juice
1 tsp. whole black peppercorns
1 tsp. cumin seeds
½ tsp. coriander seeds
½ tsp. nigella seeds
¼ tsp. fenugreek seeds
8 whole allspice berries
1 stick cinnamon
1 bay leaf

Preparation

  1. Quarter each lemon lengthwise so that it stays attached by about ½" at the stem end. 
  2. Place lemons in a bowl and stuff with the salt. 
  3. Transfer lemons to a sterilized 1-qt. glass jar and add the lemon juice, peppercorns, cumin, coriander, nigella, and fenugreek seeds, allspice, cinnamon, and bay leaf; seal with a tight-fitting lid and set aside in a dark place, shaking jar every other day or so, until lemons are soft, about 1 month. 
  4. Refrigerate after opening, and use within 2 weeks.

Monday, August 13, 2012

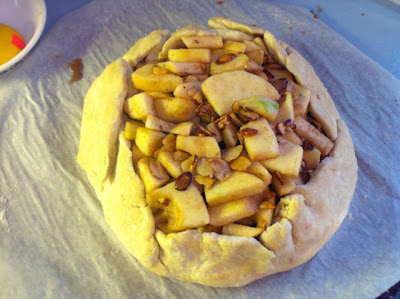
Apple & Almond Galette


A galette is a rustic French term, used to describe various flat, round, free-form crusty tarts and cakes that are cooked on a baking sheet rather than in a pan.


Apple & Almond Galette


Skill level:

Serves 8


Ingredients


For the dough

2 1/2 cups all-purpose flour
1 teaspoon. salt
1 tablespoon. sugar
16 tablespoons (2 sticks) cold unsalted butter, cut into 1/2-inch pieces
1/3 to 1/2 cup ice water

For the filling

2 pounds apples, such as Granny Smith or Jonagold, peeled, cored and cut into 1/4-inch slices
1/2 cup sliced almonds
1/2 cup sugar
2 teaspoon fresh lemon juice
1 teaspoon. ground cinnamon
1/2 teaspoon. freshly grated nutmeg
1/4 teaspoon. salt
1 1/2 tablespoons cornstarch

1 egg
1 tablespoon of milk
Sugar for sprinkling

Optional

1/4 cup apricot jam (pear also works well)
Lightly sweetened whipped cream for serving


Preparation


  1. To make the dough, put the flour, salt and sugar in a bowl. Put the butter in another bowl and place both bowls in the freezer for 10 minutes.
  2. Transfer the flour mixture to a food processor and pulse about 5 times to blend. Add the butter and pulse 15 to 20 times, until the mixture resembles coarse meal. Add 1/3 cup of the water and pulse twice. Squeeze the dough with your fingers; it should hold together but should not be sticky. If it is crumbly, add more water 1 Tbs. at a time, pulsing twice after each addition.
  3. Turn the dough out onto a lightly floured surface, gather into a ball and flatten into a disk. Wrap in plastic wrap and refrigerate for 1 hour.
  4. Place a baking sheet on the bottom rack of an oven (this will catch any run-off). Position another rack in the lower third of the oven and preheat to 400°F
  5. Line a second baking sheet with a Silpat nonstick liner and spray with nonstick cooking spray. (I usually use a large, round cooking stone or a baking sheet, always lined with parchment paper).
  6. Peel, core, and remove the stems from the apples, then gut into 1/4 inch thick pieces.
  7. Peeled apples.
    A mellon baller is a handy
    tool for coring apples.
    Cut away stems and bottoms.
    Cut into irregular, 1/4 inch thick slices.
  8. To make the filling, in a large bowl, stir together the apples, sugar, lemon juice, cinnamon, nutmeg, salt and cornstarch. Set aside.
  9. Simply add sugar, spices, and lemon juice, all at once.

  10. Brown the almonds in a shallow pan, or in the oven while it is warming.
  11. Almonds being browned in a skillet.
    Browned almonds, ready to add to the mix.

  12. Add the browned almonds to the apple mixture, and stit to combine.
  13. Add the almonds to the apple mix, and stir to combine.
  14. Remove the dough from the refrigerator and let stand for 5 minutes. 
  15. Place the dough between 2 sheets of lightly floured waxed paper and roll out into a 12-inch round. Brush off the excess flour. 
  16. If edges of the round are jagged, which mine often are, use your hands to press edges into a round shape.
  17. Rounding rough dough edges by hand.
  18. Transfer the dough to the prepared baking sheet. 
  19. Cover with plastic wrap and refrigerate for 30 minutes.
  20. Combine the egg and milk, lightly whipping until smooth, and eggs are not "streaky."
  21. Using a brush, thinly coat the dough round with the egg and milk mixture.  (Some of the egg and milk will be left over for use in Step 18).
    Egg and milk, ready to coat the pastry.
    I like to use a silicone brush to coat the pastry.
  22. Arrange the apple filling in the center of the dough, mounding the fruit slightly and leaving a 2 inch border. 
  23. Pile filling on the pastry dough, leaving a 2
    inch border all of the way around.

  24. Gently fold the edges of the dough over the apples, pleating loosely. Brush the dough with the beaten egg. Lightly sprinkle sugar over the apples.
  25. Dough edges pushed up to make a rustic shell.

  26. Brush outside of galette with the egg and milk mixture.
  27. Brush outside of shell with egg & milk mixture.
    This will give the shell a nice glossy look
    when it is baked.

  28. Bake until the crust is golden and the apples are tender, about 1 hour. Transfer the pan to a wire rack and let the galette cool completely, about 1 hour.
  29. Optional: Just before serving, in a small saucepan over medium heat, warm the jam.  Brush the apples with the jam and let cool. When cut, and ready to serve, accompany each slice with a dollop of whipped cream.